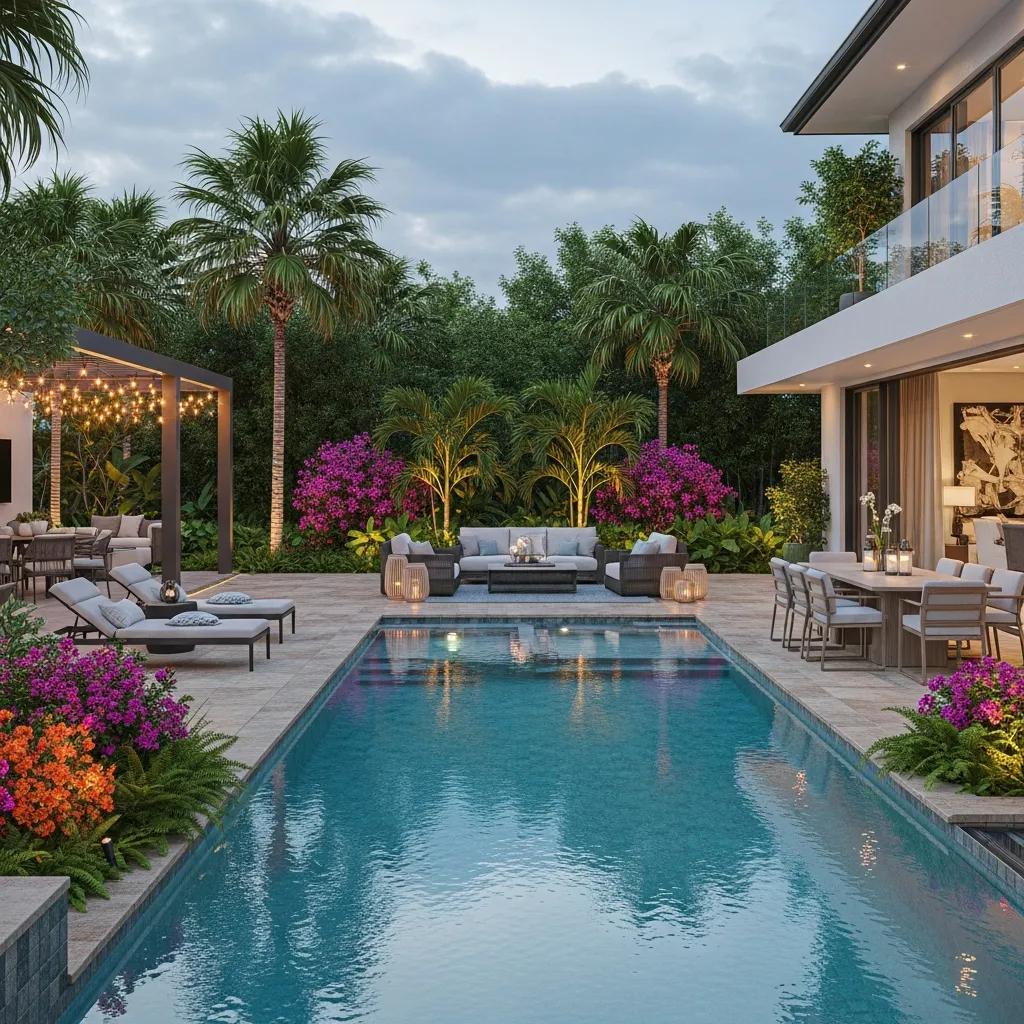
Island Pool & Landscaping — How Our Luxury Design‑Build Process Creates Your Custom Outdoor Retreat

Bringing design and construction together under one team reduces back-and-forth, protects your budget, and speeds decisions. Below we walk through how our unified design‑build process turns your ideas into a finished resort‑style backyard: clear project phases, technical checks, iterative 3D design, disciplined construction, and a careful handover. You’ll learn what to expect from the first meeting to warranty, how renderings and material specs limit surprises, typical construction milestones, and the aftercare steps that keep systems running well. This guide focuses on choices that matter in Arizona—water-wise plantings, durable finishes, and realistic timelines—so you can compare providers and plan with confidence.

This integrated approach is a reliable way to simplify complex projects and improve client outcomes.

Design‑Build: One Team, One Responsibility

Design‑Build (D‑B) combines design and construction under a single contract with one legal entity—the design‑builder. That single point of responsibility reduces coordination gaps and supports stronger project performance.

Communication issues in design-build project delivery method, 2015

We wrote this page to help discerning homeowners understand our process and feel secure choosing a design‑build partner. The goal is practical clarity—explain the steps, timelines, and service commitments that earn trust during a luxury pool and landscape project.

Our Four Phases: How a Luxury Pool Project Moves from Idea to Finished Backyard

We organize projects into sequential phases so decisions are made early, risk is reduced, and responsibility stays clear. Pairing creative design with construction planning keeps budgets realistic and timelines predictable. Below are the core phases we use on luxury pool and integrated landscape projects, with the primary objective of each and the homeowner benefit.

Island Pool and Landscaping uses a four‑phase framework that centralizes communication and makes every decision traceable—helping avoid surprises and manage permits and site constraints during construction.

  1. Vision & Discovery: Clarify goals, how you’ll use the space, budget range, and lifestyle priorities to define scope and a preliminary budget.
  2. Concept & Design: Create conceptual plans and 3D visuals that test layouts, materials, and sightlines so the scope is refined before pricing.
  3. Construction & Implementation: Carry out site work, pool structure, systems, and hardscape/softscape installs with milestone quality checks.
  4. Completion & Handover: Perform final walkthroughs, train homeowners on systems, deliver documentation, and transition warranty coverage.

These phases lead into the initial consultation, where we capture priorities and confirm feasibility before design work begins.

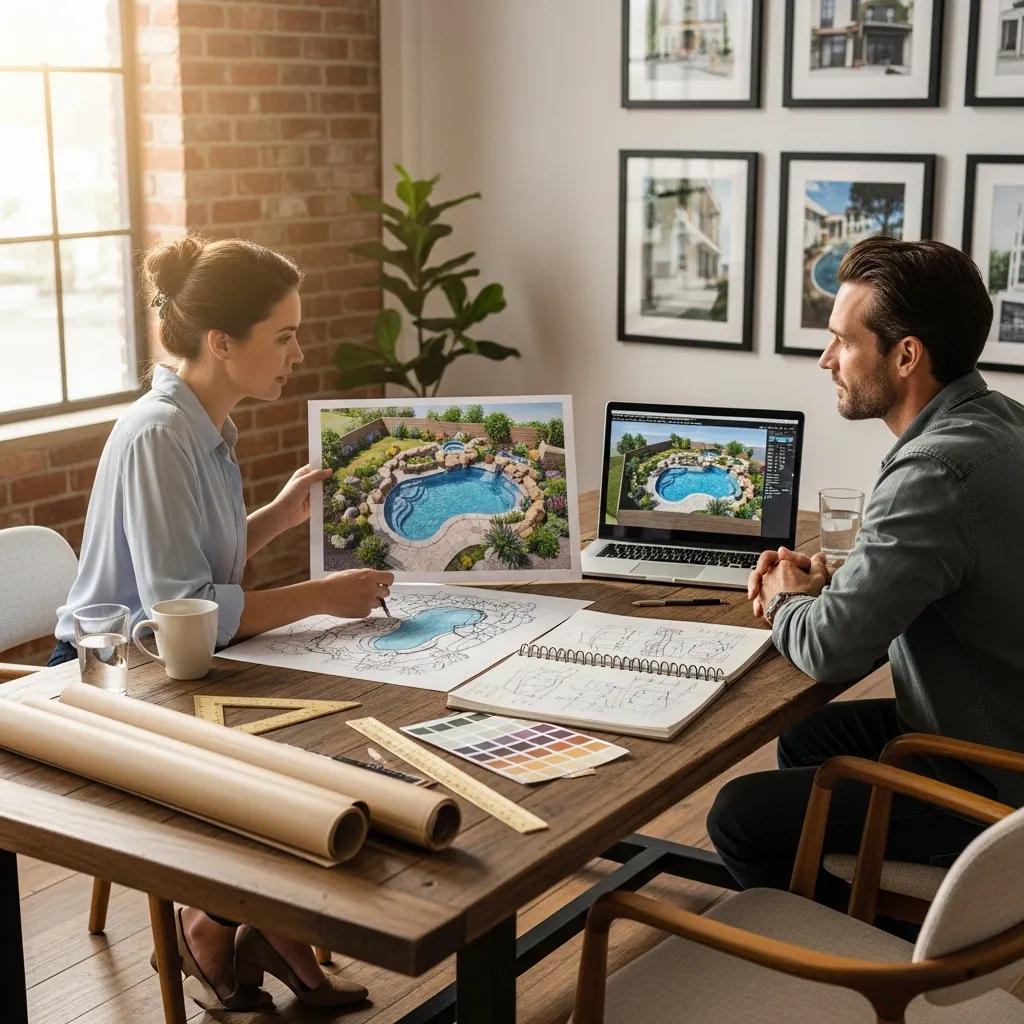
Initial Consultation: How We Learn What Matters to You

The first meeting sets expectations. We ask focused discovery questions about pool use, entertaining, maintenance tolerance, preferred styles, and your budget range so concepts align with real needs. We’ll photograph the site and note measurements or schedule a survey if needed. After the consultation you’ll get a short scope summary, a ballpark budget range, and a proposed timeline—so the next design steps and feasibility checks are clear.

Capturing lifestyle details early ensures the concept reflects how you’ll actually use the space, and it leads directly into technical site analysis.

Site Analysis & Feasibility: What We Check Early

On site we evaluate topography, drainage, utilities, access, and permitting constraints to confirm the concept is buildable and to identify what accommodations may be required. Technical checks include slope and grading reviews, utility locating, setback considerations, and preliminary drainage strategies—each one shaping design choices and cost. In Arizona we pay special attention to water use and plant palette choices so the design favors drought‑tolerant materials and native species. If a site raises concerns, we document practical options—revised grading, retaining walls, or simplified features—and show how those choices affect budget and schedule.

A thorough feasibility check minimizes change orders during construction and prepares the permit and documentation work that follows.

Concept Design & Material Selection: Balancing Look, Durability, and Cost

Conceptual design turns discovery and feasibility findings into visual options, then refines those options through review and 3D renderings until we land on a preferred scheme. Early visuals and material studies help you compare pool finishes, decking, paver layouts, and planting palettes so you can weigh aesthetics against maintenance and long‑term cost. During this phase we also prepare permit‑ready documents and detailed material specs so estimates are accurate. Prioritizing finishes and plants suited to Arizona’s climate—low‑water planting and resilient surfacing—speeds approvals and improves long‑term performance.

Clear design visuals and specifications reduce surprises on site and feed directly into permitting and construction documents.

We use high‑fidelity 3D renderings and virtual walkthroughs to align expectations and accelerate decisions.

3D Renderings & Virtual Walkthroughs: Why They Matter

3D renderings turn plans into photoreal images and walkthroughs that show materials, lighting, and spatial relationships so you can judge sightlines and scale. These tools let you see how pool shapes, deck widths, and planting masses read from key viewpoints and test alternatives before construction starts. By exposing conflicts early—visibility from indoor spaces or shade impact—renderings shorten decision cycles, reduce on‑site changes, and help lock down budgets. They also provide a clear visual reference for permitting reviewers and subcontractors.

Architectural research shows these visual tools improve client understanding and collaboration.

3D Rendering for Architectural Design & Visualization

As 3D models become central to collaborative architectural work, this study explores how rendering and VR impact user experience and coordination in design visualization.

3D Rendering Impact in Virtual Reality based Architectural Design Collaboration, 2024

Because renderings clarify intent, they directly lower construction risk and guide material specification decisions summarized next.

Choosing Finishes and Decking: Practical Options for Arizona

Material choices determine durability, maintenance, and long‑term appearance. Comparing options helps you pick finishes that match your lifestyle and climate. Common choices include pool finishes, decking materials, paving systems, and plant palettes suited to Arizona’s arid environment. Key criteria are sun resistance, slip performance, maintenance frequency, and visual character. The table below compares representative finish and decking options to help set realistic cost and upkeep expectations.

Introductory summary: Use this table to compare durability, maintenance considerations, and typical cost ranges for common finishes and decking systems.

Finish / Decking OptionDurabilityAesthetic / MaintenanceTypical Cost Range
Pebble/aggregate pool finishHighNatural texture; occasional acid wash recommendedMid–High
Quartz-based pool finishHighSmooth appearance; resists staining; moderate upkeepMid–High
Porcelain pavers (decking)Very highLow maintenance; uniform look; cooler underfootHigh
Stamped concrete (decking)MediumHighly customizable; periodic resealing advisedLow–Mid
Native xeric planting paletteHighLow water needs; seasonal interest; minimal irrigationLow–Mid

Higher‑quality materials usually mean lower lifetime maintenance and more consistent aesthetics; choosing finishes that match your use and upkeep tolerance prevents regret down the road.

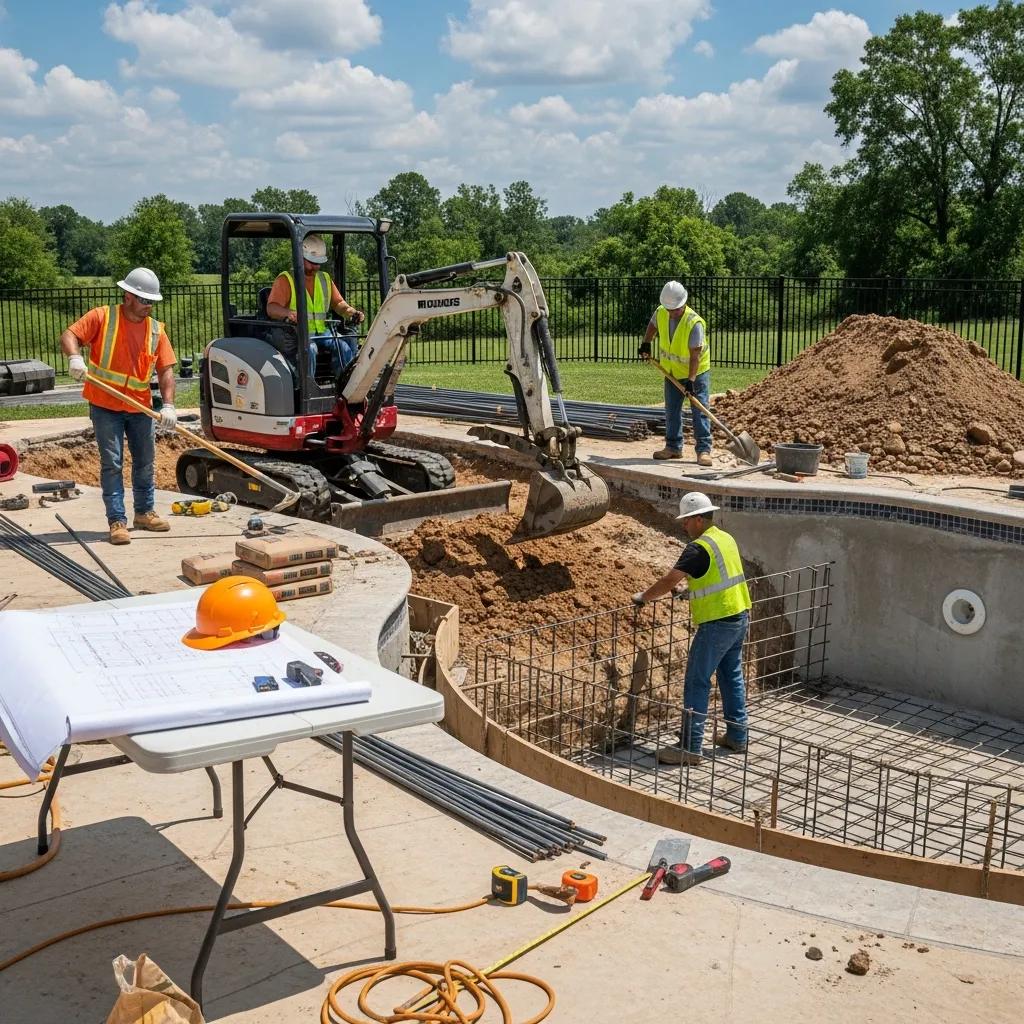
Construction & Implementation: How We Build Your Resort‑Style Backyard

Construction turns approved designs into reality through coordinated site prep, pool structure, mechanical systems, and landscape finishes—while following a schedule and quality checks. Work typically starts with permitting and mobilization, moves through excavation and structural shell work, and finishes with decking, equipment installation, and planting. We manage site logistics—dust control, staging, and neighbor access—to keep the job safe and minimize disruption. Clear milestone expectations and documented QA at each stage help you track progress and reduce uncertainty about timing or scope changes.

Below is a concise timeline mapping major construction phases to typical durations so you can plan around site activity and milestone reviews.

Construction PhaseKey TaskTypical Timeline / Duration
Permitting & mobilizationSecure permits and prepare site2–8 weeks
Excavation & structural workDigging, steel, and shotcrete/gunite shell1–3 weeks
Plumbing & electrical rough-inInstall pipework and conduits before finishes1–2 weeks
Finishes & deckingPool finish, pavers, decks, and coping2–4 weeks
Landscaping & commissioningPlanting, irrigation, system startup1–3 weeks

Knowing typical timelines helps you plan milestone meetings and personal access; the next section explains how project management and client communication support those checkpoints.

Project Management & Communication: Keeping Your Project on Track

Strong project management centralizes schedule control, subcontractor coordination, and client communication so the build stays on track and transparent. Your dedicated project manager delivers weekly progress summaries, milestone alerts, and acts as the single escalation point for decisions. Communication usually includes an agreed response SLA, regular photo or video updates, and scheduled on‑site walkthroughs at critical stages. A steady cadence—weekly updates plus milestone meetings—keeps you informed without slowing construction.

Clear communication reduces friction and supports the quality assurance checks described next.

  1. Dedicated Project Manager: One point of accountability to coordinate teams and report status.
  2. Weekly Progress Updates: Short summaries that document completed tasks and next steps.
  3. Milestone Walkthroughs: Onsite reviews at key stages for client sign‑off.

These practices preserve decision transparency and help prevent scope creep during construction.

Key Milestones & Quality Checks

Milestones are inspection points where we verify quality and obtain approvals before proceeding—this prevents rework and hidden defects. Typical checks include pre‑pour verification of steel and embeds, rough‑in confirmation for plumbing and electrical, structural shell integrity tests, leak and pressure testing, and final finish inspections for tile, coping, and decking. At each checkpoint we create a documented punch list with assigned resolution timelines; third‑party testing or municipal inspections are scheduled as required. Proactive QA—site supervision, photos, and formal sign‑offs—reduces disputes and ensures systems work as designed.

The checklist below summarizes primary checks and who usually performs them so you know what to expect for verification and correction times.

  1. Pre-Pour Inspection: Verify steel, forms, and embedments before concrete or shotcrete placement.
  2. Rough-In Verification: Confirm plumbing and electrical routing and slopes before covering.
  3. Leak and Pressure Tests: Test circulation and pressure lines to confirm system integrity.
  4. Finish Inspection: Review tile, coping, decking, and equipment installation for workmanship.
  5. Final Systems Commissioning: Demonstrate automation, filtration, heaters, and controls to the owner.

These milestones connect directly to the final walkthrough and handover, where documentation and training are provided.

Completion, Handover & Aftercare: Our Close‑Out Process

Completion and handover formalize acceptance of the finished project and give you the tools to operate and maintain systems confidently. The final walkthrough produces a punch list for remaining items, and we deliver manuals, warranty paperwork, and in‑person system demonstrations so you know how to run pumps, automation, and irrigation. The handover package typically includes maintenance recommendations, seasonal care checklists, and clear instructions for service or warranty requests. Transparent warranty terms and optional aftercare plans provide ongoing support after we leave the site.

In short: final walkthrough, documentation delivery, equipment training, and warranty handover are the core elements of a successful completion.

Final Walkthrough & Handover: What to Expect

The final walkthrough follows a structured agenda: confirm punch‑list items, demonstrate pool systems and controls, and hand over manuals and as‑built notes. Your project manager will show you pool automation settings, filtration basics, irrigation schedules, and the recommended first 30 days of operation—while recording any remaining punch‑list items and completion targets. Deliverables include the completed punch list, equipment manuals, a maintenance schedule, and warranty documentation so you know who to contact for future service. This handover transfers practical knowledge and sets expectations for post‑handover care.

After the walkthrough you’ll have the documentation and training needed for confident, safe operation and for filing any warranty claims if necessary.

Warranty & Aftercare: Ongoing Protection and Support

Warranty and aftercare describe the post‑construction protections that keep structural and mechanical investments performing as intended. Typical categories include structural warranties, manufacturer equipment warranties, and workmanship remedies; many clients also enroll in ongoing maintenance plans for cleaning, chemical balancing, and seasonal startup/shutdown services. The table below outlines common service types, coverage scope, and typical durations so you know what to expect after handover and how to request service.

Introductory note: The following table summarizes typical warranty and aftercare offerings, their scope, and expected durations.

ServiceCoverage / ScopeTypical Duration
Structural WarrantyProtection for pool shell integrity and major structural defects10 years (typical industry benchmark)
Equipment WarrantyManufacturer coverage for pumps, heaters, and control systems1–5 years depending on the component
Workmanship & FinishRemedy period for installation defects and finish issues1–2 years
Aftercare Maintenance PlanRoutine cleaning, chemistry management, and seasonal servicesOngoing (subscription-based)

Clear warranty terms and a simple service request process reduce owner worry and protect the value of your investment.

  • Service Request Process: Clear steps to log issues and expected response windows.
  • Regular Maintenance: Early scheduled service to stabilize water chemistry and system performance.
  • Warranty Documentation: All manufacturer and contractor paperwork provided at handover.

These aftercare steps set homeowners up for long‑term success and lead into why clients select our firm.

Why Island Pool & Landscaping: Local Expertise, Single‑Team Accountability

We specialize in design‑build luxury pools and complete outdoor living spaces—resort‑style pools, integrated hardscapes, thoughtful planting, and artificial turf where appropriate. Our designers focus on refined compositions that balance beauty and function. We back our work with responsive communication (24‑hour reply window Monday–Saturday), a satisfaction‑guaranteed final walkthrough, and custom, no‑obligation plans. Local Arizona plant knowledge is built into every design so landscapes are drought‑conscious and resilient. Those commitments help guide clients from concept through long‑term care.

What our service commitments mean for you:

  • Creative designers who compose resort‑style layouts that work for real life.
  • Proactive communication and defined response SLAs to keep schedules moving.
  • Satisfaction‑guaranteed walkthroughs and customized, no‑obligation plans to protect your interests.

If you want a single‑team accountability model paired with local landscape insight and disciplined communication, our process is designed to protect your investment and deliver a beautiful, lasting outdoor space.

Our Promise: Clear Communication, Careful Quality, Confident Ownership

We commit to transparent communication, rigorous quality assurance, and a handover that leaves you comfortable operating every system. That includes detailed documentation, scheduled milestone sign‑offs, and a final walkthrough covering maintenance and operation—steps that reduce surprises after handover. Our 24‑hour reply window (Mon–Sat) keeps small issues from becoming big problems and reflects our practical service ethic. Together with creative design and local planting expertise, these standards help clients feel confident during construction and throughout ownership.

These service standards naturally lead into simple steps to start your transformation.

Ready to Start? How to Prepare for Your Consultation

Begin by gathering recent yard photos, listing priority features, and setting a loose budget range so the design team can recommend realistic options. Expect discovery questions about lifestyle, entertaining, irrigation tolerance, and maintenance preference. After the meeting we’ll outline next steps, feasibility checks, and a proposed timeline. Bringing reference images, site constraints, and any HOA rules speeds concept development and permitting. The initial consultation is a no‑pressure way to build trust and shape a clear plan.

A short checklist to bring to your consultation:

  • Recent photos of the yard and key house elevations.
  • A list of must‑have features and nice‑to‑have items.
  • An estimated budget range and timeline preferences.

Being prepared makes the discovery phase faster and more productive so your project moves smoothly into design and permitting.

Frequently Asked Questions

What should I consider when choosing a design-build firm for my outdoor project?

Look for experience with luxury outdoor spaces, a portfolio you admire, and local references. Verify their track record with drought‑tolerant landscaping if you’re in Arizona. Pay attention to communication habits—how they handle updates and response times—and ask about warranty and aftercare so you know what support looks like after handover.

How can I prepare for the initial consultation with the design team?

Gather recent yard photos and house elevations, list must‑haves and nice‑to‑haves, and set a rough budget and preferred timeline. Bring reference images and any HOA guidelines. These materials help the team give realistic options and keep the first meeting focused and productive.

What are the benefits of using 3D renderings in the design process?

3D renderings show materials, scale, and sightlines in a realistic way so you can choose finishes and layouts with confidence. They reveal potential conflicts early, shorten decision time, and give contractors and permitting authorities a clear visual target—reducing costly changes during construction.

How do you handle changes or modifications during the construction phase?

We document any requested change, review its cost and schedule impact with you, and issue a formal change order for approval. Your project manager will explain implications before work proceeds so decisions are transparent and the schedule stays on track where possible.

What types of aftercare services do you offer post-construction?

We offer warranty support for structural and equipment items plus optional maintenance plans for cleaning, chemical balancing, and seasonal startup/shutdown. We also provide a clear process to request service so issues are handled promptly and professionally.

How do you ensure quality during the construction process?

Quality is managed through defined milestones and inspections—pre‑pour checks, rough‑in verification, leak and pressure tests, and finish inspections—overseen by your project manager. We document inspections and corrective actions so there’s a clear record of quality control throughout the build.

What is the typical timeline for completing a luxury pool and landscaping project?

Timelines vary with scope and site complexity. From initial consultation to final handover a project can take several weeks to a few months. Major phases—permitting, excavation, structural work, and finishes—each have their own typical durations. Understanding those ranges helps you plan and stay informed about progress.

Conclusion

Choosing a design‑build approach gives you a single team accountable for design and construction, which reduces miscommunication and protects your investment. With clear phases, disciplined project management, and a focus on climate‑appropriate materials, you can move from concept to a beautiful, functional outdoor living space with confidence. When you’re ready, schedule an initial consultation and we’ll help you begin the transformation.